online marketing tools that make life easier for small business owners

When I first talk with small business owners about their marketing needs, one topic that always comes up is that of time management. There just doesn’t seem to be enough time in the day to run a business and also send out Facebook posts, Tweets, and Google+ updates.

There are a lot of amazing tools out there to help with online marketing – as an example, check out buffersocial’s list of “61 Best Social Media Tools for Small Business”.

So to help you out, I thought I’d share my favourite online tools that make my life easier (and I promise it’s a short and simple list!).

  1. Hootsuite – I can’t say enough about how incredibly helpful Hootsuite is (and as a bonus, it’s a Canadian company based out of Vancouver). I’ve been a pro user of HootSuite for several years, and love how it allows me to manage my profiles and schedule content for a variety of social media networks (HootSuite currently supports Twitter, Facebook, Google+, LinkedIn, foursquare, WordPress and mixi). It has a great calendar feature where you can view all of your scheduled posts, and also has an analytics component so you can see how people interact with your content. And I especially love the auto-schedule feature, where Hootsuite determines the best day and time to share your updates.
  2. Hootlet – Technically part of Hootsuite, but it’s such a time-saver that it deserves a spot by itself. Hootlet is an extension used with Google Chrome that places a little owl icon within your internet browser. Like a website and want to share it with your followers? Just click on the owl, add your own comments, and then click on “AutoSchedule”, “Send Now” or choose to schedule the message yourself for a future day and time. Easy!
  3. TweetDeck – I previously wrote a blog post about why TweetDeck is such a great Twitter tool. As much as I really love Hootsuite, it’s just not the most visually-appealing tool out there. TweetDeck does a fantastic job of presenting Twitter content in a way that is easy to view and scroll through. And it also displays all images that people share through Twitter itself (but not Instagram photos) so it makes it easier and quicker to know what you are sharing. Similar to Hootsuite, TweetDeck lets you schedule messages for future days and times.
  4. Facebook page scheduling tool – Although Hootsuite can schedule and send posts to your Facebook page, I prefer using Facebook’s own scheduling tool to plan my posts for all of the Facebook pages I manage. I find that it does a good job of showing how a post will look in a user’s newsfeed, and it makes it easy to enable post scheduling and editing with multiple page administrators. And if you are a business owner with employees who work for you, I would highly recommend looking into having some of your staff help you out with scheduling posts for your Facebook page. Looking for the old Facebook scheduling tool on your business page? It’s moved – check out this video to find out where it went!

What about you? Do you have a favourite tool that helps you out with time management for social media? Let me know in the comments!

When I first started on Twitter back in 2008, I viewed all Tweets within the Twitter interface. Then, I got hooked on HootSuite, especially when I started managing multiple Twitter accounts. I’m still a paying subscriber to HootSuite and love using the cute little Hootlet add-on to easily share interesting URL’s on Twitter. But something just seemed to be missing.

Enter TweetDeck. This slick desktop application (I prefer the downloaded version, although you can access it online as well) is always running in the background and has become my favourite way to interact with users on Twitter.

Here’s 5 reasons why I like TweetDeck so much:

1. Visually attractive – let’s face it, looks matter. And TweetDeck just plain looks good. I love the black background, the well-sized Twitter profile pics, and the fact that you can always view thumbnail images of pics that people post on Twitter.

2. It still displays Instagram images – as you may have heard, Twitter and Instagram went through a big breakup at the end of 2012. Basically, the end result was that Instagram pictures no longer display within the Twitter interface; instead, you need to click on a link and be taken to another page to view the image. Not so with TweetDeck! You can still view thumbnail images of kids, half-eaten restaurant dishes and scenery shots and also view the full-sized images within TweetDeck.

Update November 2014: Instagram images are no longer displayed in TweetDeck; instead, you need to click on the link and view the image in your browser.

3. Easily view different streams – using TweetDeck’s columns feature, you can add a new column for whichever Twitter account, list, or search result you want. And then you can quickly flip back and forth between them, making it quick and simple to keep up-to-date on what’s going on in your version of the Twittersphere.

4. It makes noise – you can turn on or off sound alerts for each of your columns, so that you hear a ding every time someone messages you, mentions you, writes a Tweet that matches your search criteria, etc. (If you want to make my computer ding, just mention @jenhames on Twitter!)

5. It’s free – I already pay for lots of social media tools and services, so it’s great to find such a great tool that is free.

Do you use TweetDeck? Love it or hate it?
Then leave a comment and let me know what you think.

Facebook left menu - Facebook Interest List

A few months ago, Facebook introduced ‘Interest’ lists. If you know me, you’ll know that I love lists; I have them for everything from steps to achieve clients’ goals, to what to pack for a camping trip, to just plain keeping my entire life in order.

Facebook Interest lists are great for two reasons. First, they allow you to organize the pages that you already like into lists, so that you can quickly and easily browse through those pages’ updates. And second, you can follow lists that other people have created, which probably include pages that you’ve never heard of before.

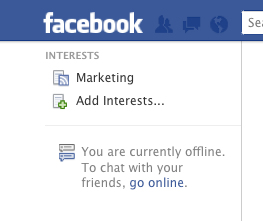
Facebook left menu - Facebook Interest ListYou may have an Interests section on the lefthand menu of your Facebook homepage; if so, click on “Add Interests”.


If not, the easiest way to add the Interests section is to click in the white box at the top of the page that says “Search for people, places and things” and enter the name of a page that you would like to add to an interest list. Once you are on that Facebook page, click on the drop-down arrow beside “”Message” and select “Add to Interest Lists” (see below). Then click “+ New List…”

Later, once you’ve created Interest lists, this is one way that you can add additional pages to the list.


Facebook Interests

A box will pop up; click on “Pages” on the lefthand side. Then start scrolling through the list of pages that you like and click on each page that you want to add to the list – a check mark will appear on each page that you have selected. Click “Next”, then add a name for the list and select who can see the list (public, friends or just you). Click “Done” and you are finished!

Now go to your Facebook homepage (click the Facebook icon on the upper lefthand corner) and on the lefthand menu you will see “Interests” with your newly created list. Click on the list to view updates from only the pages within the list, instead of your entire newsfeed.

To add a new Interest list, click on “Add Interests” on the lefthand menu and then follow one of the suggested lists, search for a list by keyword, or create a new list of your own.

And there you have it – how to organize the Facebook pages you follow using the Interest list.

[divider_line]

Click here to add my “Marketing Pages to Follow” Interest list. And if you have your own Interest list, feel free to post it in the comments section.

Keeping up with social media networks, researching marketing best practices and pouring through content takes a lot of time. But it’s also enjoyable (for me, at least) and easily accomplished. The rest of my business tasks, as well as personal tasks, however, require a bit more planning and structure, a.k.a. lists.

I’ve always been a fan of lists. I have grocery lists, travel packing lists, client lists. And also the dreaded to-do list. Years ago, my to-do lists consisted of scribbles on anything I could get my hands on, from scraps of papers to old envelopes. But as my work evolved and I took on more responsibilities, the time eventually came for my lists to get a bit more sophisticated.

Enter my beautiful to-do book, which is the perfect size to fit in every bag I own. I even wrote my favourite organization quote on the inside for inspiration: “Deal with difficult tasks while they are easy; act on large issues while they are small.”

Recently, I read the book “Organizing Your Day: Time Management Techniques That Will Work for You” by Marsha Sims and Sandra Felton (who also has the amazingly inspiring website, Messies Anonymous). In the book, the authors suggest making your to-do list more powerful by separating it into sections. So now each time I start a new to-do list page, I begin by dividing each page into four quadrants: Go, Do, Buy and Contact.

[blockquote align=”right” cite=”Lao Tzu”]Deal with difficult tasks while they are easy; act on large issues while they are small.[/blockquote]

“Go” means places that I need to go, such as the post office, bank, coffee shop. “Do” refers to things I need to accomplish, such as filing papers or writing a blog post. “Buy” means exactly that, things I need to buy, which may include stamps, office supplies or dog food. The book originally listed “Call” as the fourth quadrant, but for me, “Contact” is a better heading as I may need to call, email, Facebook message, or text someone.

I love this new system, because it gives some order to my tasks and forces me to be a bit more thoughtful when I write something in my book.

How do you stay on top of your to-do items? Does it need revising?