Quick overview of Facebook Multi-Product Ads

Quick overview of Facebook Multi-Product AdsLately, you may have noticed multi-product ads on Facebook. They feature multiple images, each with its own linkable URL. Apparently they are seeing higher than normal results for less than normal cost. And they look pretty good too!


If you’re a small business owner, you should really pay attention. Facebook multi-product ads seems especially well-suited to retail shops (you could feature images of your most recent / best-selling items), restaurants, coffee shops, and service providers like salons, and photographers. Remember, each image links to its own page, so it is a chance to showcase different sections of your website. And you only pay for one ad,  even though there’s multiple images and links.Facebook Multi Product Ad

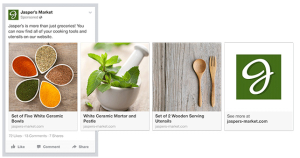
This is one of the newest and biggest things on Facebook at the moment, and I recommend jumping on board before everyone else does.

It took me a while to figure out how to make these, but I finally found a very simple, step-by-step set of instructions on the Facebook page. You can view the info here: https://www.facebook.com/help/382681505244772

Note that in order to take advantage of this new type of ad, you need to be using Facebook’s Power Editor. And you can only use Power Editor through the Google Chrome website browser. But it is amazing. Check it out!

Need some help? Please send me a message or leave a comment. Happy Facebooking!

Alternative Sources to Google Images

Alternative Sources to Google Images

We all know that images are a great way to catch people’s eye. And it can be tempting to do a Google search to find the perfect image to match your words. After all, it’s quick, easy, and the pictures that you see in the Google results look so amazingly wonderful that you just can’t wait to slap them on your own Facebook page / Twitter update / blog post!!

But hold on a second. The reason the pictures that show up in Google images look so gosh darn brilliant is that a lot of them are copyrighted. Applications and websites such as tineye.com (a reverse image search tool) make it very easy for image owners to find out who is using their pictures without permission. You might get away with using someone else’s image and no one will be the wiser. Or you could end up with an angry email from someone asking you to take the image down, or even threaten to sue you for copyright image infringement.

So what (legal) options are available for a non-graphic designer like yourself?

Here’s a few suggestions:

1. Use your own photos. Today’s smartphones feature some pretty great cameras, and I’m sure you’re already taking oodles of photos. Simply scroll through your own pictures and upload an image to suit your content.

2. Enhance your own photos. Use an app like Instagram to add a filter, put a box around your image, or enhance the picture. There are also apps such as Frametastic, Mosaic, and YourMoments (and many other apps as well) that let you make photo collages, add text, fun borders, and much more. Have fun, create an awesome graphic, and then email it to yourself so that you can access it from your computer (or post right away using your phone).

FreeImages.com is a source of free images3. Use non-copyrighted images. There are many websites that feature free, non-copyrighted images that are uploaded from users around the world. My go-to site is free-images.com It requires a (free) registration to download images, but the pictures are free and you can use them without worrying about copyright violations. Other suggestions are rgbstockDollar Photo Club and morgueFile. You can also check out this blog post by Jacob Gube titled “Where to Find the Best Free Stock Photos” and “53+ Free Image Sources For Your Blog and Social Media Posts” on the buffersocial blog.

4. PicMonkey. Although I’ve only used PicMonkey a few times (I usually use Photoshop instead), it’s a great online tool to edit and modify your images. You can easily add text, your company logo, filters, frames, and much more. It’s free to use, although there are premium features that require a paid subscription to unlock. Definitely worth checking out if you are interested in creating custom images for your online content.PicMonkey is a great image tool

Finally, if I can’t convince you to stop using other people’s images, at the very least include credit to the image creator and a link to the original source.

Any suggestions for places to find great images? Let me know in the comments!
Like this post? Please click the share buttons to let other people know.

online marketing tools that make life easier for small business owners

When I first talk with small business owners about their marketing needs, one topic that always comes up is that of time management. There just doesn’t seem to be enough time in the day to run a business and also send out Facebook posts, Tweets, and Google+ updates.

There are a lot of amazing tools out there to help with online marketing – as an example, check out buffersocial’s list of “61 Best Social Media Tools for Small Business”.

So to help you out, I thought I’d share my favourite online tools that make my life easier (and I promise it’s a short and simple list!).

  1. Hootsuite – I can’t say enough about how incredibly helpful Hootsuite is (and as a bonus, it’s a Canadian company based out of Vancouver). I’ve been a pro user of HootSuite for several years, and love how it allows me to manage my profiles and schedule content for a variety of social media networks (HootSuite currently supports Twitter, Facebook, Google+, LinkedIn, foursquare, WordPress and mixi). It has a great calendar feature where you can view all of your scheduled posts, and also has an analytics component so you can see how people interact with your content. And I especially love the auto-schedule feature, where Hootsuite determines the best day and time to share your updates.
  2. Hootlet – Technically part of Hootsuite, but it’s such a time-saver that it deserves a spot by itself. Hootlet is an extension used with Google Chrome that places a little owl icon within your internet browser. Like a website and want to share it with your followers? Just click on the owl, add your own comments, and then click on “AutoSchedule”, “Send Now” or choose to schedule the message yourself for a future day and time. Easy!
  3. TweetDeck – I previously wrote a blog post about why TweetDeck is such a great Twitter tool. As much as I really love Hootsuite, it’s just not the most visually-appealing tool out there. TweetDeck does a fantastic job of presenting Twitter content in a way that is easy to view and scroll through. And it also displays all images that people share through Twitter itself (but not Instagram photos) so it makes it easier and quicker to know what you are sharing. Similar to Hootsuite, TweetDeck lets you schedule messages for future days and times.
  4. Facebook page scheduling tool – Although Hootsuite can schedule and send posts to your Facebook page, I prefer using Facebook’s own scheduling tool to plan my posts for all of the Facebook pages I manage. I find that it does a good job of showing how a post will look in a user’s newsfeed, and it makes it easy to enable post scheduling and editing with multiple page administrators. And if you are a business owner with employees who work for you, I would highly recommend looking into having some of your staff help you out with scheduling posts for your Facebook page. Looking for the old Facebook scheduling tool on your business page? It’s moved – check out this video to find out where it went!

What about you? Do you have a favourite tool that helps you out with time management for social media? Let me know in the comments!

Open for Business Image


[blockquote]”I don’t think people know we’re open.”[/blockquote]

Photo credit: sadiya

Last week, I made dinner plans for Monday. And then I had a hand-slap-forehead-moment when I realised that Monday can be a tricky night in a small town because a lot of places are closed.

I Googled the restaurant and found… nothing. I tried to locate them on Facebook, with no luck. I entered “restaurant name + hours” and came up empty-handed, although I did see results for other restaurants in the area who were closed on Monday. Then I found the restaurant’s phone number and decided to give them a call. The phone rang and rang and rang… and no one answered, not even an answering machine.

Finally, I decided to just go to the restaurant. After all, we could always figure out something else if it was closed.

I got there and the restaurant was open – pretty empty, but definitely serving food. I commented to our server that I was happy they were open and asked if it was always so quiet on a Monday. She said yes, always quiet, although she wondered why, as most other places were closed. And then she said, “I don’t think people know we’re open.”

So if your company is open for business, why don’t you make it easy for your clients and customers to actually do business with you? I’ll even give you my beginner’s 4-step plan:

1. Answer your phone. If you can’t, make sure you have some sort of voice mail system set up.

2. Have a website. Even if it just has your hours of operation, location address and contact information, that will be enough for people to find you online.

3. Set up a Google Places for Business profile (click here to get started). Add the same information as in number 2. After all, it’s Google, one of the most-used search-engines out there.

4. Start a Facebook page. Add the same information as on your website, and post an update once a month. The page will be accessible to Facebook users and will also show up in search results. Bonus points for setting up a vanity URL for your page.

Need help with these steps or know someone who could benefit from some coaching? You can always reach me at jen@jenuinemarketing.com or facebook.com/jenuinemarketing

And yes, Jenuine Marketing is open for business!

Facebook left menu - Facebook Interest List

A few months ago, Facebook introduced ‘Interest’ lists. If you know me, you’ll know that I love lists; I have them for everything from steps to achieve clients’ goals, to what to pack for a camping trip, to just plain keeping my entire life in order.

Facebook Interest lists are great for two reasons. First, they allow you to organize the pages that you already like into lists, so that you can quickly and easily browse through those pages’ updates. And second, you can follow lists that other people have created, which probably include pages that you’ve never heard of before.

Facebook left menu - Facebook Interest ListYou may have an Interests section on the lefthand menu of your Facebook homepage; if so, click on “Add Interests”.


If not, the easiest way to add the Interests section is to click in the white box at the top of the page that says “Search for people, places and things” and enter the name of a page that you would like to add to an interest list. Once you are on that Facebook page, click on the drop-down arrow beside “”Message” and select “Add to Interest Lists” (see below). Then click “+ New List…”

Later, once you’ve created Interest lists, this is one way that you can add additional pages to the list.


Facebook Interests

A box will pop up; click on “Pages” on the lefthand side. Then start scrolling through the list of pages that you like and click on each page that you want to add to the list – a check mark will appear on each page that you have selected. Click “Next”, then add a name for the list and select who can see the list (public, friends or just you). Click “Done” and you are finished!

Now go to your Facebook homepage (click the Facebook icon on the upper lefthand corner) and on the lefthand menu you will see “Interests” with your newly created list. Click on the list to view updates from only the pages within the list, instead of your entire newsfeed.

To add a new Interest list, click on “Add Interests” on the lefthand menu and then follow one of the suggested lists, search for a list by keyword, or create a new list of your own.

And there you have it – how to organize the Facebook pages you follow using the Interest list.

[divider_line]

Click here to add my “Marketing Pages to Follow” Interest list. And if you have your own Interest list, feel free to post it in the comments section.

Have you tried out the new Facebook Pages app? For anyone who manages at least one Facebook page, this is a great addition, and even better for those of us who manage multiple pages. But it does have its limitations…

So what can you actually do with this app? Well, you can:

  • View page posts and filter them to show either only the page’s posts, or everyone’s posts
  • Like and comment on the page’s posts
  • Write a new post or share a photo
  • View a list of the people and pages who like the page
  • See new notifications
  • View a list of admins associated with the page
  • And the most important thing is the ability to view a simplified insights overview for the page

And the limitations?

  •  Much of what you can do with this app, you can also do on the regular Facebook mobile app (provided you have set up your page correctly), such as writing new posts, sharing photos and liking and commenting on posts
  • While you are able to view a list of page admins, you can’t change their authorizations or add or delete admins. Clicking on an individual admin simply takes you to their Facebook profile on the main Facebook app
  • The insights provided are very simple compared to the advanced insights available on the web version

So what do you think of the new Facebook pages app?

We all love Facebook. It is where we post our pictures, spy on our friends’ lives, send messages, and respond to events. But there is also a lot of discontent with Facebook, for many reasons, one of which is the constant updates and changes to the way Facebook looks and operates.

Facebook CartoonThe newest proposed change (see, sometimes Facebook gives advance notice!) is the roll-out of the “timeline” layout for pages, with March 30th scheduled as the day when it all goes down.

The two most important things for businesses:

  1. The custom welcome landing tabs will no longer have the same impact, as users will automatically be taken to the timeline page. Viewing the welcome tab will require users to actually locate and click on the tab.
  2. Time to make another Photoshop image – the suggested size for Facebook cover photos is 850px wide by 315px high.

Are you excited about the change? Have you already switched your business pages over to the timeline view?